
# Job Management and Scheduling
# Scheduler Overview
# Submitting Jobs
# How to Start Calculations Using SLURM
SLURM (Simple Linux Utility for Resource Management) is a job scheduling system used in high-performance computing (HPC) clusters. It helps manage resources, schedule tasks, and monitor the system's load, enabling efficient allocation of computational power for large-scale calculations and data processing.
# Example SLURM Script
To run a calculation on a cluster, you need to create a SLURM script that specifies the resources required for the job (e.g., number of CPU cores, runtime, memory). Here is a simple example of a SLURM job script:
bash
#!/bin/bash
#SBATCH --job-name=my_job      # Job name
#SBATCH --output=output.log     # Output file
#SBATCH --ntasks=1              # Number of tasks (CPU cores)
#SBATCH --time=01:00:00         # Maximum runtime
#SBATCH --mem=4GB               # Amount of memory

# Command to run the calculation
./my_calculation_program
Save this script with a .sh extension. To submit the job to SLURM, use the following command:
sbatch my_job_script.sh
# Interactive Jobs
Interactive jobs allow you to run tasks in real-time, which is particularly useful for testing code or conducting experiments that require immediate feedback. With interactive jobs, you can request resources on the cluster for a set period and run commands directly in the session.
To start an interactive job, use the following command:
srun --ntasks=1 --time=01:00:00 --mem=4GB --pty bash
This command launches an interactive bash session where you can execute commands directly on the cluster and experiment with your code in a live environment.
WARNING
When running interactive jobs, if you receive the message:
srun: job 125643432 queued and waiting for resources
this means exactly what it says: your job is waiting for resources and may not start immediately. This is normal behavior, and sometimes it may take a few minutes before the job begins, depending on resource availability.
# Submitting Jobs with a Specific Grant (--account)
In SLURM-based systems, users often have access to multiple project accounts (also called grants). To submit a job under a specific grant, use the --account flag.
# Basic Syntax
srun --account=<service_id> <other_options>
# Example: Interactive Bash Session
To start an interactive shell session using the grant service_id, run:
srun --account=pl0000-01 --pty /bin/bash
# Submitting Batch Jobs with sbatch
You can also submit batch jobs using the --account flag in the command line or within the job script.
# Example Job Script (job_script.sh):
#!/bin/bash
#SBATCH --job-name=test_job
#SBATCH --account=pl0000-01
#SBATCH --time=00:30:00
#SBATCH --ntasks=1

echo "Hello from SLURM"
# Example of running in interactive mode using an X server (GUI)
# Windows
To run the application in graphical mode in Windows, you need to install an X server on your local machine (e.g. Xming - https://sourceforge.net/projects/xming/ or MobaXterm - http://mobaxterm.mobatek.net/).
After installing and starting the X server, the following icon will appear on the left side of the Windows system:

Next, start the X server and log in to the machine, e.g. via Putty (http://www.putty.org/) with active redirection to the X server.
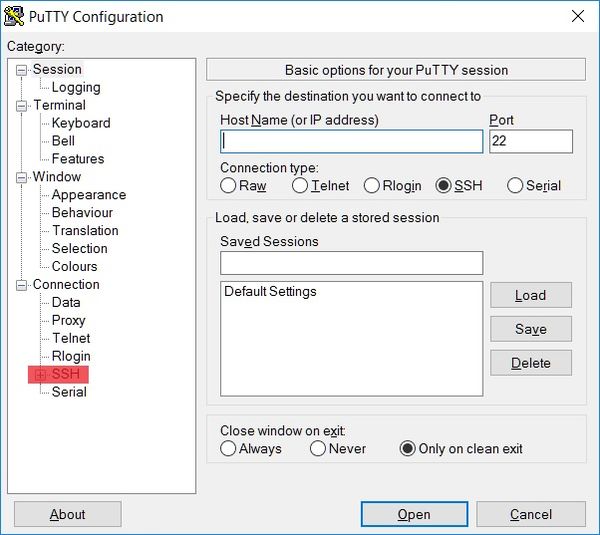
To start redirection to the X server, click the SSH tab from the drop-down list on the left side of Putty.
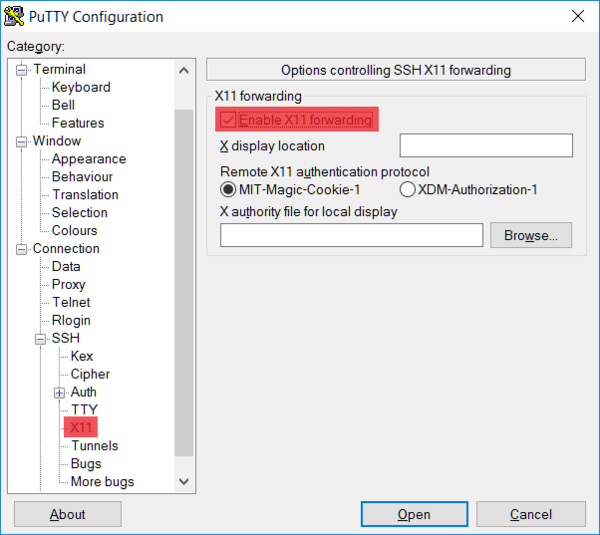
Next, select the X11 tab and activate X server forwarding (Enable X11 forwarding).
# Linux
To start the X server in Linux, log in to the machine with X forwarding.
ssh -X eagle.man.poznan.pl
After logging in to the machine in Windows or Linux, start interactive mode by executing the following command:
srun -n 1 --mem=4096 --time=24:00:00 --pty --x11=first bash -i -l
To check if the redirection to the X server is working correctly, run xterm
xterm
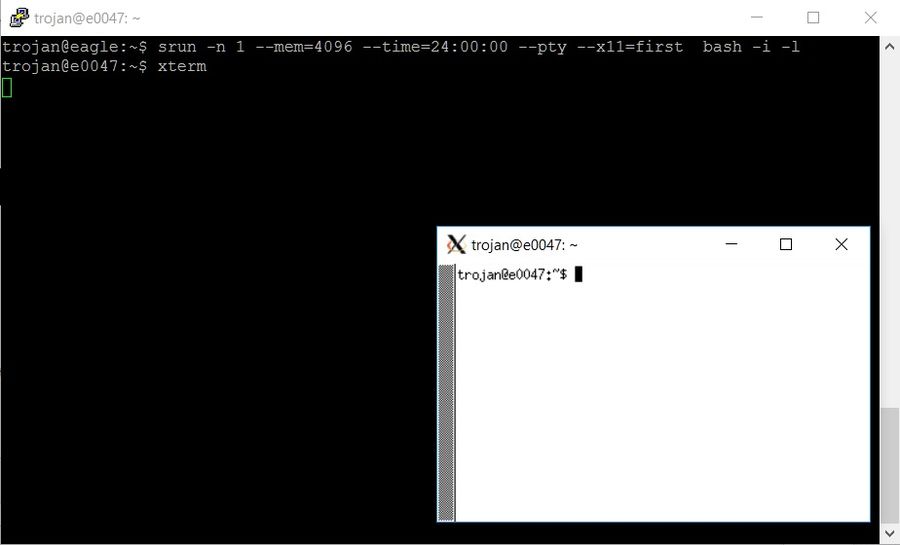
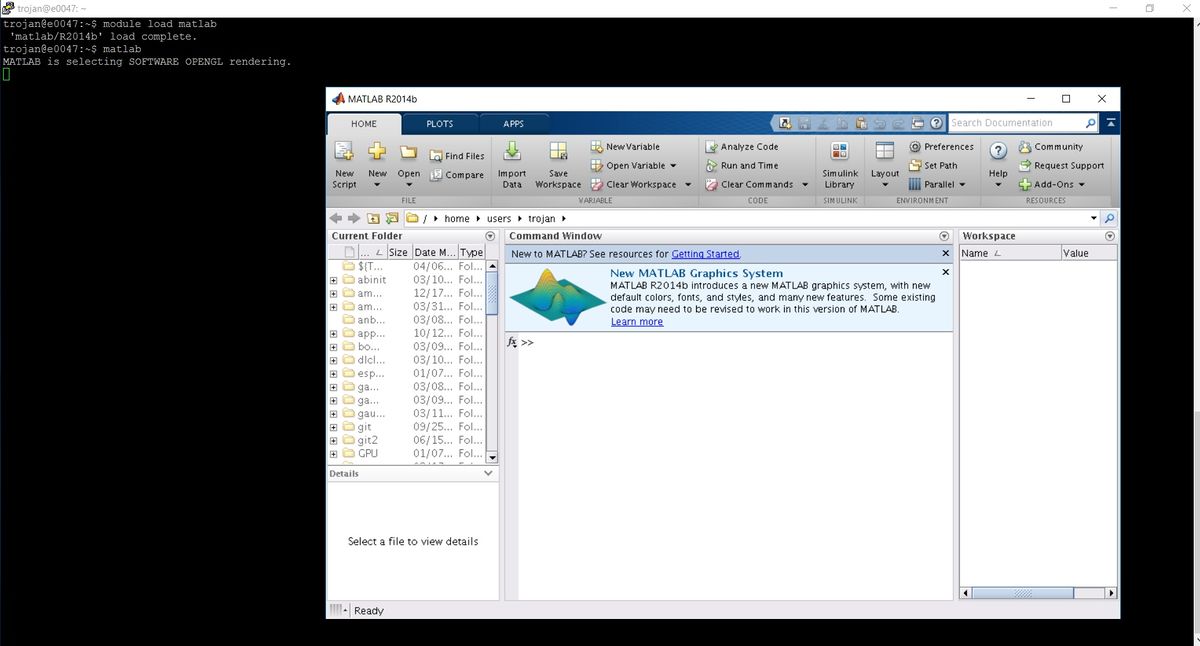
For example, we can launch the Matlab software
module load matlab/R2016b
Once the module is loaded, we launch Matlab.
matlab
We get the graphical interface of the Matlab application
# Containers
# Introduction
# What are containers?
Containers are a form of operating system virtualization. A single container might be used to run anything from a small micro-service or software process to a larger application. Inside a container are all the necessary executables, binary code, libraries, and configuration files. This ensures that the application behaves the same, no matter where it is deployed.
Containers isolate the application from the host system and other containers.
Since everything the application needs is included in the container, it will run the same way on any machine.
Containers share the host system's operating system, which makes them more lightweight and faster to start compared to virtual machines.
# Features of Slurm job containers
- Supports GPU usage
- The home directory on the host machine is mounted in and used as the working directory inside the container.
# Limitations of Slurm job containers
- Containers must run under unprivileged (i.e. rootless) invocation.
- Virtual networks are not supported. All containers should work with the "host" network.
- Job containers are limited to user defined number of cores, memory, and GPUs just like regular jobs.
# Prerequisites
- Singularity by default is using .singularity directory in homedir as default cache target used for downloading and building images - it is optional but we strongly recommend that you create a link to your own private directory e.g. on project_data of your project:
mkdir ~/<grant_id>/project_data/containers_<username>
ln -s ~/<grant_id>/project_data/containers_<username> .singularity
# Simple approach
This method is fast and simple - suitable for beginners but useful also for more experienced container users. It requires minimum effort (adding "--container" flag followed by the image name).
It's perfect option for users who only want to run single-node jobs, however doesn't support multi-node MPI jobs.
Before running the container the appropriate image should be built, or pulled from repo.
useful for single node jobs
# Features / Limitations:
- single node jobs only
# Scenario 1: Run interactive job container from public Docker image
This example is just to show that we can enter a specific container in interactive mode.
Before one can use container images, first the user must create a directory where the singularity cache will be stored and link it to the appropriate place.
mkdir ~/<grant_id>/project_data/containers_<username>/
ln -s ~/<grant_id>/project_data/containers_<username>/ .singularity
- Just to compare to a non-container scenario
Run interactive job
srun -p proxima --pty /bin/bash
Check the OS
cat /etc/os-release
hostname
Leave interactive job (crtl+d)
- Lets say we need container with the latest version of Ubuntu, user can follow one of 2 paths:
Pull the image from docker repo and run the container using sif file:
srun -p proxima singularity pull ~/<grant_id>/project_data/containers_<username>/ubuntu.sif docker://ubuntu:latest
srun --gpus-per-node 1 -p proxima --container <your_grant_id>/scratch/ubuntu.sif --pty /bin/bash
WARNING
The singularity pull command converts Docker images to SIF format (creating squashfs), which is memory-intensive. If the process is killed with an OOM Killed error, increase the allocated memory using the --mem flag:
srun --mem 16G -p proxima singularity pull ~/<grant_id>/project_data/containers_<username>/ubuntu.sif docker://ubuntu:latest
For larger images (e.g. containing CUDA/GPU libraries), use --mem 32G or more.
Run the container using the path directly to the remote image repository
srun --gpus-per-node 1 -p proxima --container docker://ubuntu:latest --pty /bin/bash
- -p proxima (for now only proxima partition works with --container functionality)
- --pty (allows terminal mode)
- --container docker://ubuntu:latest (after --container flag we pass the name of the image from which the container will be run)
- --gpus-per-node (specify the number of GPUs required for the job on each node)
Check if we are indeed inside container on worker node:
cat /etc/os-release
hostname
Additionally we can check if gpus are accessible from within the container:
nvidia-smi
Leave container (crtl+d)
# Scenario 2: Build your custom container
(we will use singularity to build the container - the software is available only on worker nodes)
Let's say we need to run a python script generating a csv file, it uses pandas and numpy libraries.
- Create python file e.g. scenario2.py and copy this inside:
import pandas as pd
import numpy as np
df = pd.DataFrame(np.random.randn(100, 4), columns=list('ABCD'))
df.to_csv("some.csv")
# Try to run python script with geopy and pandas
- Run scenario2.py using the python image
srun --mem 10G -p proxima --container docker://python:latest bash -c "python3 ~/<grant_id>/scratch/scenario2/scenario2.py"
The script uses the numpy and pandas libraries, which are not standard python libraries, so to run such a script, we need to build a special image with the libraries installed.
# Prepare image
- Start interactive job on a worker node (one can only build image on worker node)
srun -p proxima --pty /bin/bash
- Create definition file (it describes the process of building the image) e.g. scenario2.def and copy this inside:
## build from the latest python image from docker image repository
Bootstrap: docker
From: python:latest

## This section is where you can download files from the internet with tools like git and wget,
## install new software and libraries, write configuration files, create new directories, etc.
%post
    yes | pip install pandas
    yes | pip install numpy
- Build the image:
sudo singularity-build ~/<grant_id>/project_data/containers_<username>/python.sif ~/<grant_id>/scratch/scenario2/scenario2.def
the python.sif image file will be created
- Leave the interactive job (ctrl+d)
# Alternative option would be to build docker image locally and push it to the remote repository.
# Try to run python script but from the container
srun -p proxima --container ~/<grant_id>/project_data/containers_<username>/python.sif bash -c "python3 ~/<grant_id>/scratch/scenario2/scenario2.py"
# Scenario 2: Use existing image as a part of batch script
We will use the image python.sif built in the previous scenario, but this time submit job in batch mode.
- Create scenario2.sh file with following content
#!/bin/bash
#SBATCH --job-name "scenario2_job"
#SBATCH -p proxima
#SBATCH --output scenario2-%x.%J.%N.out
#SBATCH -N 1
#SBATCH --tasks-per-node 1
#SBATCH --gpus-per-node 1
#SBATCH --container ~/<grant_id>/project_data/containers_<username>/python.sif

python3 ~/<grant_id>/scratch/scenario2/scenario2.py
echo "done"
- Submit the batch script (the execution takes up to 30 seconds)
sbatch scenario2.sh
- The some.csv should appear
# Advanced approach
This method is more complicated and requires additional configuration by the user, but is more flexible and allows jobs to be run in multiple-node mode.
# Limitations / features
- Manual installation of available storage directories (
scratch/project_data, andarchiveonly for older services where it already exists) by the user is necessary - It will be necessary to indicate where to store images downloaded from public repositories (set SINGULARITY_CACHEDIR)
- The MPI implementation in the container must be compliant with the version available on the system
- To use the gpu you need to add the --nv flag after the 'singularity run'
- Allows multi-node MPI mode
<!--
# Build image with MPI script
This will be a simple ‘hello world’ style MPI script, showing that multi-node mode works.
- Create directory and go into one
mkdir mpi_dir
cd mpi_dir
- Create file scenario3.c and copy inside:
#include <mpi.h>
#include <stdio.h>
#include <stdlib.h>

int main (int argc, char **argv) {
        int rc;
        int size;
        int myrank;

        rc = MPI_Init (&argc, &argv);
        if (rc != MPI_SUCCESS) {
                fprintf (stderr, "MPI_Init() failed");
                return EXIT_FAILURE;
        }

        rc = MPI_Comm_size (MPI_COMM_WORLD, &size);
        if (rc != MPI_SUCCESS) {
                fprintf (stderr, "MPI_Comm_size() failed");
                goto exit_with_error;
        }

        rc = MPI_Comm_rank (MPI_COMM_WORLD, &myrank);
        if (rc != MPI_SUCCESS) {
                fprintf (stderr, "MPI_Comm_rank() failed");
                goto exit_with_error;
        }

        fprintf (stdout, "Hello, I am rank %d/%d\n", myrank, size);

        MPI_Finalize();

        return EXIT_SUCCESS;

 exit_with_error:
        MPI_Finalize();
        return EXIT_FAILURE;
}
- Create definition file scenario3.def and copy:
Bootstrap: docker
From: ubuntu:18.04

%files
    scenario3.c /opt

%environment
    # Point to OMPI binaries, libraries, man pages
    export OMPI_DIR=/opt/ompi
    export PATH="$OMPI_DIR/bin:$PATH"
    export LD_LIBRARY_PATH="$OMPI_DIR/lib:$LD_LIBRARY_PATH"
    export MANPATH="$OMPI_DIR/share/man:$MANPATH"

%post
    echo "Installing required packages..."
    apt-get update && apt-get install -y wget git bash gcc gfortran g++ make file

    echo "Installing Open MPI"
    export OMPI_DIR=/opt/ompi
    export OMPI_VERSION=4.0.5
    export OMPI_URL="https://download.open-mpi.org/release/open-mpi/v4.0/openmpi-$OMPI_VERSION.tar.bz2"
    mkdir -p /tmp/ompi
    mkdir -p /opt
    # Download
    cd /tmp/ompi && wget -O openmpi-$OMPI_VERSION.tar.bz2 $OMPI_URL && tar -xjf openmpi-$OMPI_VERSION.tar.bz2
    # Compile and install
    cd /tmp/ompi/openmpi-$OMPI_VERSION && ./configure --prefix=$OMPI_DIR && make -j8 install

    # Set env variables so we can compile our application
    export PATH=$OMPI_DIR/bin:$PATH
    export LD_LIBRARY_PATH=$OMPI_DIR/lib:$LD_LIBRARY_PATH

    echo "Compiling the MPI application..."
    cd /opt && mpicc -o mpitest scenario3.c
- Start interactive job on a worker node (one can only build image on worker node)
srun -p proxima --pty /bin/bash
- Build image
sudo singularity-build scenario3.sif scenario3.def
- Leave the interactive job (ctrl+d)
Run the test on 2 nodes, 4 processes on each
You can use srun
srun -p proxima -N 2 --ntasks-per-node 4 --gpus-per-node 4 --mpi pmix singularity run --nv --bind /mnt/ scenario3.sif /opt/mpitestYou can use sbatch
Create scenario3.sh file with following content
#!/bin/bash
#SBATCH --job-name "scenario3_job"
#SBATCH -p proxima
#SBATCH --output scenario3-%J.%N.out
#SBATCH -N 2
#SBATCH --tasks-per-node 4
##SBATCH --gpus-per-node 4

IMAGE_NAME="scenario3.sif"

echo "Running on hosts: $(echo $(cat /etc/hostname))"
srun --mpi pmix singularity run --nv --bind /mnt/ $IMAGE_NAME /opt/mpitest
echo "done"
Submit the batch script
sbatch scenario3.sh
-->
# Job Queue and Priority
# Interactive vs. Batch Jobs
# Interactive Jobs
- Description: Provide real-time access to computing resources, allowing users to run commands and debug applications interactively.
- Use Cases:
- Testing and debugging scripts or applications.
- Running small-scale computations that require immediate feedback.
# Batch Jobs
- Description: Run non-interactively by submitting a script to a job scheduler, which queues and executes the job when resources become available.
- Use Cases:
- Large-scale or long-running computations.
- Tasks that can be automated or do not require real-time interaction.
Key Difference: Interactive jobs prioritize immediate access, while batch jobs focus on efficient scheduling and resource utilization for automated tasks.
# Resource Allocation and Limits
# Job Monitoring and Management
While working on the cluster, you can easily check how much CPU, memory, or GPU resources your job is using — both while it’s running and after it finishes.
Below are some useful commands to monitor resource usage:
# seff – summary of resource usage for a completed job
The seff command displays information about memory, CPU, and runtime usage for a specific SLURM job.
Example usage:
seff 35995542
Example output:
Job ID: 35995542
Cluster: eagle
User/Group: trojan/users
State: RUNNING
Cores: 1
CPU Utilized: 00:00:00
CPU Efficiency: 0.00% of 00:00:52 core-walltime
Job Wall-clock time: 00:00:52
Memory Utilized: 0.00 MB (estimated maximum)
Memory Efficiency: 0.00% of 2.00 GB (2.00 GB/core)
This helps you verify whether your job efficiently used its allocated resources.
🟢 Run on the login node after your job has finished.
# nvidia-smi – current GPU utilization
The nvidia-smi command shows real-time GPU usage, including memory consumption and GPU load.
Example usage:
nvidia-smi
Example output:
+-----------------------------------------------------------------------------------------+
| NVIDIA-SMI 570.86.15              Driver Version: 570.86.15      CUDA Version: 12.8     |
|-----------------------------------------+------------------------+----------------------+
| GPU  Name                 Persistence-M | Bus-Id          Disp.A | Volatile Uncorr. ECC |
| Fan  Temp   Perf          Pwr:Usage/Cap |           Memory-Usage | GPU-Util  Compute M. |
|                                         |                        |               MIG M. |
|=========================================+========================+======================|
|   0  NVIDIA H100                    On  |   00000000:E4:00.0 Off |                    0 |
| N/A   29C    P0             69W /  699W |       1MiB /  95830MiB |      0%      Default |
|                                         |                        |             Disabled |
+-----------------------------------------+------------------------+----------------------+
Useful for quickly checking GPU status during a running job.
🔸 To get current data, you need to connect directly to the compute node where your job is running, and run nvidia-smi there.
# nvtop – interactive GPU usage monitor
nvtop provides a real-time, text-based interface showing GPU load, memory usage, and the processes using the GPUs.
Example usage:
nvtop
It opens an interactive view similar to htop for CPUs — allowing you to monitor multiple GPUs at once.
🔸 Just like nvidia-smi, you must log in to the node where your job is currently running to see live GPU data.
Once there, nvtop will display the current GPU and memory usage by your processes.
# How to connect to the compute node where your job is running
Check which node your job is running on:
squeue -u $USER
In the NODELIST column, you’ll see the node name, e.g. gpu001.
Connect to that node via SSH:
ssh <node_name>
Run GPU monitoring commands:
nvidia-smi
nvtop
This will display the current GPU and memory usage for your running job.
# Job status - e-mail
What can I do to get information about the status of the task to my email address? (concerns the Eagle cluster)
To receive an email, please add to the script:
#SBATCH --mail-type=<type>
where <type> can take a value: BEGIN, END, FAIL, REQUEUE, ALL, TIME_LIMIT, ARRAY_TASKS
BEGIN - beginning of the job
END - completion of the job
FAIL - the job has failed
REQUEUE - the job stopped counting and was back on the line.
ALL - all the above statuses
TIME_LIMIT - the jobcounts 50,80,90 procent of the declared time
ARRAY_TASKS - Send an email about each job type array
The above values can be used together, for example
#SBATCH --mail-type=BEGIN,FAIL
By default, information about the status of tasks is sent to the email address associated with the account. To send information to a different address, specify it in the form below:
#SBATCH --mail-user=address_email
Please make sure the address is correct